Complete technical guide covering installation requirements and procedures for motorized curtain systems in Dubai properties
Understanding Curtain Box Requirements
Before installation, verify your ceiling curtain box has adequate space for the motor housing. Insufficient clearance is one of the most common installation challenges.
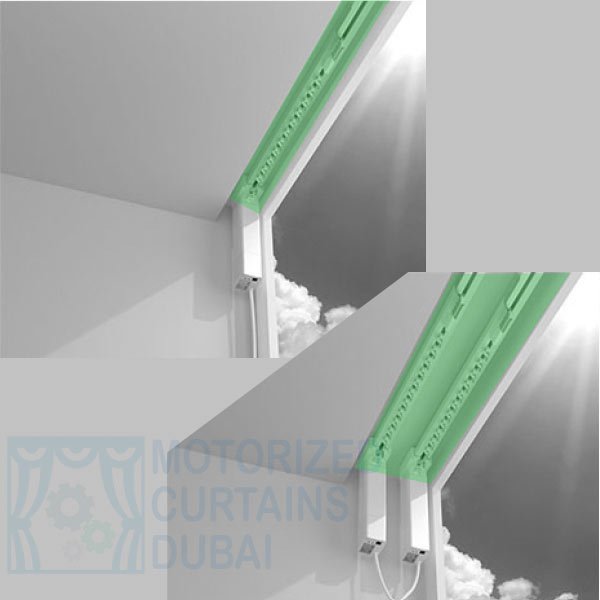
Recommended Clearance Space
- Single Track System:
Minimum 10cm tunnel clearance - Double Track System:
Minimum 20cm tunnel clearance - Motor Clearance:
~7cm – ensure adequate space - Track Width:
32mm is track width, and clearance recommendations are for easier installation process
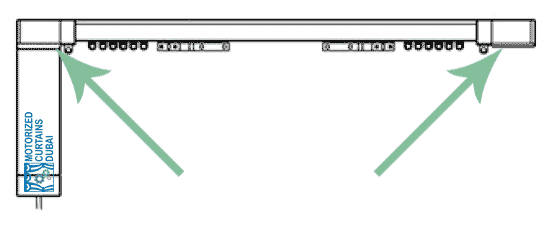
⚠️ Note: The motor can be mounted on either the left or right side of the track. Plan your installation to ensure the motor side has clear access to power supply.
Full Wall vs Half Wall Installation
Determining whether to install a full wall or half wall curtain system depends on your window dimensions and available wall space.
🪟 Full Wall Installation
Track extends across entire wall width, creating seamless full-wall coverage.
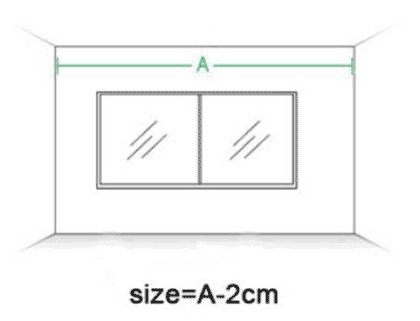
📏 Full-wall tip:
Always deduct 2cm from total wall measurement for proper clearance.
🪟 Half Wall Installation
Track frames the window with extensions on each side, full-window coverage.
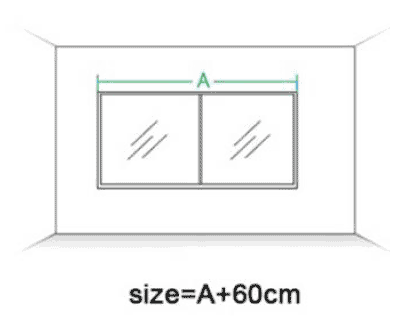
📏 Half-wall tip:
• Need 60cm extra (30cm each side)
• Window + 60cm = Track Length
💡 Installation Calculation Example
Scenario: Window is 3m wide, Wall is 3.3m total
✓ Ideal half wall: 3m + 0.6m = 3.6m
✗ Problem: 3.6m exceeds 3.3m wall
✓ Solution: Use 3.2m or 3m (full wall)
Pro Tip: When space allows, longer tracks are better than shorter for improved light coverage. Never exceed wall dimensions.
Opening Configuration Options
Choose how your curtains open based on room layout and access requirements
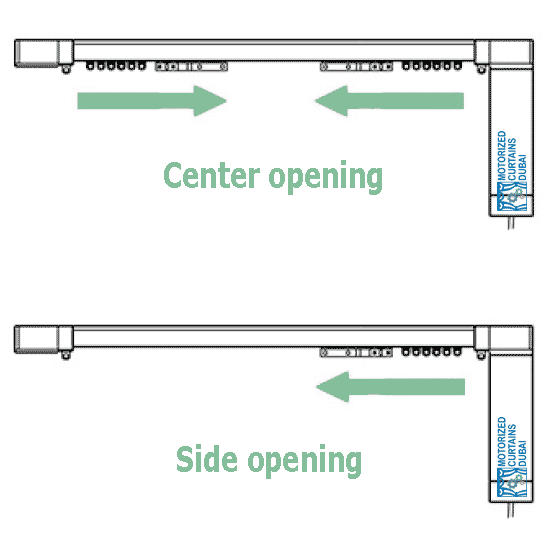
↔️ Center Split
Two panels open from middle
- Symmetrical appearance
- Equal weight distribution
- Cannot change after install
← One Side
Single panel stacks left or right
- Adjustable before install
- Ideal for corner/tiny windows
- Specify direction when ordering
📌 Installation Note: Confirm opening direction before installation begins. Center-split configurations are fixed and cannot be changed after track assembly.
Motor Placement & Configuration
⚙️ Motor Installation Position
- ✓ Can mount on left or right side
- ✓ Position based on power outlet location
- ✓ Requires 10cm clearance
- ✓ Consider furniture and room access
⚠️ Multi-Motor Guidelines:
Straight tracks >10m: Use 2 motors
Curved tracks >6m: Use 2 motors
Prevents strain and ensures smooth operation
Electrical Connection Setup
🔌 Standard Configuration
- Plan high-level socket: near left or right side of window
- Keep same standard: don’t mix left & right sockets if possible to avoid confusions when ordering
- Near Motor: plan the power source near to motor as possible to avoid long cable runs.
- Consider concealed wiring in renovations
- Voltage: 220-240V (UAE standard)
- Plug Type: Type G (UK 3-pin) for UAE
💡 Professional Tip: Coordinate with your electrician early. Installing power outlets inside curtain box before track mounting creates the cleanest appearance with no visible wiring.
Track Assembly for Extended Lengths
Tracks longer than 2.5m are shipped in sections and assembled on-site
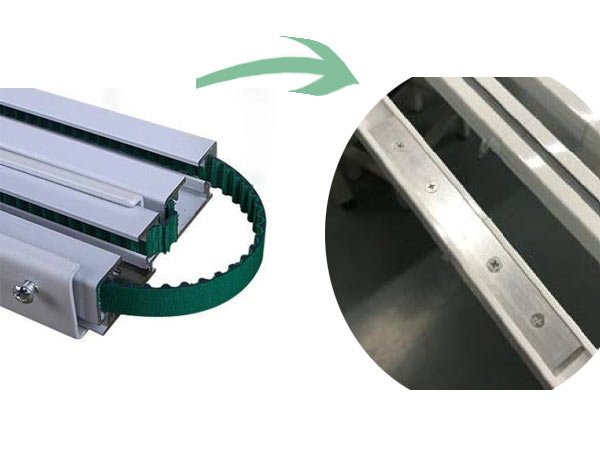
Assembly Process
Tracks arrive pre-cut in sections with connectors included.
- Lay out all sections in order
- Insert connector into first section
- Slide second section onto connector
- Ensure full seating and alignment
- Repeat for additional sections
- Test glider smoothness
🔧 Assembly Note: Properly connected sections create a seamless rail with no visible gaps. Test gliders along entire track before ceiling installation to ensure smooth operation.
Curved & Angled Track Installation
Special angle connectors enable installations for bay windows, corners, and curved walls
📐90° Angle
Ideal for:
Corner windows • L-shaped
📐135° Angle
Ideal for:
Bay windows • Obtuse angles
📐Custom Angles
Ideal for:
Curved walls • Unique architecture
🔧 Installing Angled Sections – Step by Step
- Measure and mark angle change point
- Cut straight sections to proper lengths
- Insert angle connector between sections
- Ensure connector fully seated
- Test curtain glider through angle
- Mount following wall contour precisely
⚠️ Curved Track Note: 90° & 135° ready connectors available for easier fabrication, while custom angles require manual measurements & molding.
Double Track System Installation
Install two independent tracks for combining sheer and blackout curtains
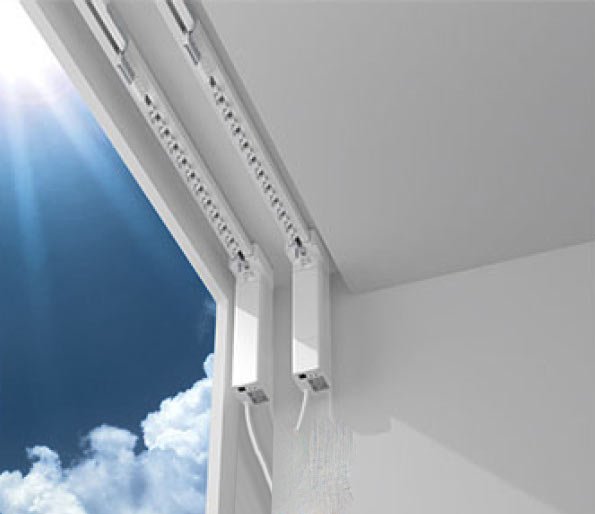
Requirements
- Clearance: 20cm among 2 tracks
- Systems: Two complete tracks
- Motors: Two motors required
- Operation: Independent control
- Power: Two connections (can share outlet)
🔧 Installation Tip: Install back track first for easier bracket access. Front track obstructs work area if installed first.
Installation Sequence
① PREP
Verify 20cm clearance
Mark mounting positions
② BACK TRACK
Install rear track first
Mount motor and test
③ FRONT TRACK
Install front track
Mount motor and test
④ VERIFY
Test independent operation
Hang curtain fabric
Pre-Installation Checklist
Complete this checklist before beginning installation to ensure proper preparation
📏 Measurements
- ☐ Total wall width measured
- ☐ Window width confirmed
- ☐ Curtain box depth verified
- ☐ Installation method determined
- ☐ Track length calculated
- ☐ Ceiling height marked
⚙️ Configuration
- ☐ Single/double track selected
- ☐ Opening direction chosen
- ☐ Motor placement decided
- ☐ Multiple motors planned
- ☐ Angles identified
- ☐ Connectors specified
🔌 Electrical
- ☐ Outlet location identified
- ☐ Wire length calculated
- ☐ Wire routing planned
- ☐ Voltage verified (220-240V)
- ☐ Electrician coordinated
🔧 Materials
- ☐ Track sections received
- ☐ Motors unpacked and tested
- ☐ Hardware organized
- ☐ Connectors verified
- ☐ Installation tools ready
Professional Installation Recommended
While this guide provides comprehensive technical information, motorized curtain installation requires precision, electrical knowledge, and experience with mounting systems.
For optimal results and warranty protection, professional installation is strongly recommended in UAE.